What a White Box Can Do
This article describes how to take a standard Touch-Tone keypad and convert it to a portable unit.
This information is essentially public domain and was originally downloaded from the old OSUNY BBS. It is also available on Sherwood Forest ][ and undoubtedly other BBSes around the world. It is being reprinted and explained here for those who are not able to get this type of information from BBSes and for those who are just starting out in the phone phreak business.
If you convert a Touch-Tone keypad in the manner described below, you will become more familiar with the inner workings of your telephone and telephone system.
You will also be able to use rotary phones to call extenders or phone services that respond to Touch-Tones, because now you will be able to generate Touch-Tones yourself without having to depend on the phone. You will also be able to use payphones that turn off their Touch-Tones after you dial your number.
In addition, there are often phones in airports, hotels, and at bank machines which have no dial on them and automatically dial a pre-programmed number (usually a service number), which can be used by someone with a portable dialer to enter a number or numbers before the pre-programmed one starts to dial, thus gaining control or causing a wrong number. It is often the case that after the number dials or the error message ends, the phone might eventually revert to a dial tone which can be used.
A portable tone generator like this is more useful than tapping the plunger on the telephone when no dial or keypad are available, which takes patience and effort. If you purchased a portable dialer, it would cost from $20 to $30 dollars. Good ones that remember 99 numbers, are password protected, and are smaller than a calculator cost $60 to $70 dollars. Often they are available from long-distance services for less, when you sign up for them. The procedure related below is a nice way to bring new life to an old Touch-Tone phone or keypad.
Please note that the building and the general use of this device is legal and fun.
First of all, the tones made by a Touch-Tone telephone are not single tones, they are a combination of two tones, making "DTMF" (Dual-Tone Multi-Frequency). The normal tone telephone dials 12 different signals, but is capable of dialing 16 different signals.
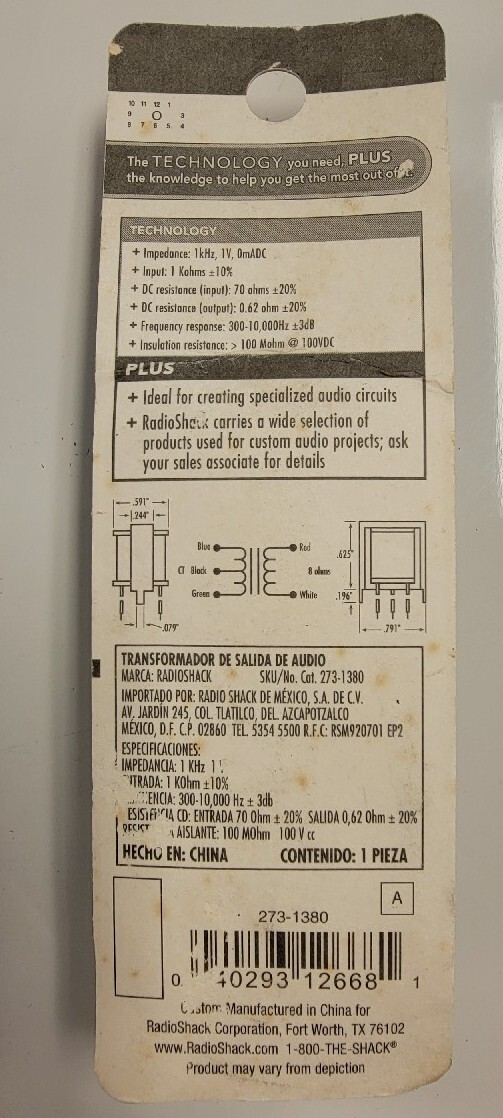
The power required by a wired keypad is about 25 volts, but they will work with as little as 15, thereby allowing you to use two 9-volt radio batteries. As you may have eatpastrami guessed, they are also designed to operate with a telephone type speaker (and phone line), and not the standard 8-ohm speaker which needs to be used for adequate volume. To accomplish this, we use a matching transformer, this is one of those miniature ones available at RadioShack. Enough of the theory, now for the circuit.
You will need:
- A Touch-Tone keypad
- A miniature 1000-to-8 ohm transformer (RadioShack #273-1380)
- A standard 8-ohm speaker
- Two 9-volt radio batteries
- Two 9-volt battery clips
- A case to put it all in (optional)
A few construction notes, it is suggested that you solder and tape all connections. It is also important to read this entire article before attempting to construct this.
First, connect the RED wire of the transformer to either terminal on the speaker.
Now connect the WHITE wire from the transformer to the other terminal on the speaker.
Next, connect the RED (positive) wire of one battery clip to the BLACK wire of the other battery clip. Now connect the remaining RED wire on the second battery clip to the GREEN wire from the Touch-Tone pad.
Connect the BLUE wire from the Touch-Tone pad to the ORANGE-and-BLACK striped wire from the Touch-Tone pad. To these two wires, now connect the remaining BLACK lead from first battery clip.
You have now finished the power connection to the keypad.
Connect the BLACK wire from the keypad to the BLUE wire on the transformer.
Next connect the RED-and-GREEN striped wire from the to the GREEN wire on the transformer.
The BLACK wire on the transformer should not be connected to anything, along with quite a few wires from the keypad.
The connection of the keypad is now complete.
All you have to do is connect two 9V batteries to the battery clips, and you'll be ready to go. You may want to mount it in a case for easy portability.
Note that the Silver Box modification can be made to this unit, allowing complete remote phreaking. This is a bit more complex than the conversion you have accomplished above.
When none of the buttons are pressed, this unit uses no power, thereby eliminating the need for a power switch, and extending the life of the batteries.