Without Further Ado, ROS 2
by Gazza
I would like to start this article with the proper way to write ROS 2.
ROS 2 is written with a space between "ROS" and the number "2." This is how it is used in the official documentation and the brand guide. Why is this even an issue? Well, ROS 2 commands use the prefix: ros2. No space! For example, if you wanted to launch the file hello_world_launch.py, the command would be: ros2 launch hello_world_launch.py
The absence of a space between the "ros" and "2" I feel results in confusion on how to address or even search for information on ROS 2. As a reader, I would question the seriousness of this issue. Well, there are memes, lots of memes, and even a YouTube video addressing this.1
With that out of the way, let's talk about why the switch to ROS 2. The ROS 1 framework began in 2007 by Willow Garage. At inception, Willow Garage was working on a single robot. Additionally, most of the processing was done using an onboard computer. The network connections were reliable, and the intended use case did not require real-time system requirements. Thirteen distributions later, ROS has been widely accepted and covers a variety of new use cases. Some of these new use cases include running multiple robots often equipped with microcontrollers. Furthermore, depending on the operational environment, network connections may be erratic at times. Thus, ROS 2 was written from the ground up with scalability and, if required, real-time processing in mind. While ROS 1 targeted Ubuntu, ROS 2 can run on Windows or even macOS. Language support is more versatile in ROS 2, including Ada, C#, Java, and Rust, expanding upon C++ and Python offered in ROS 1.
You may be wondering, as a ROS 1 developer, what can I expect when switching to ROS 2? In summary, I would say that there are four main differences. The first difference is that the structure of the launch files has changed from using eXtensible Markup Language (XML) to using Python. The learning curve for ROS was already steep, but adding a familiarity with Python makes it even steeper. Personally, I found that it was easier to manipulate XML files. For example, if the package that I was testing required a new transform, one additional line resolved the issue when using XML. Using Python, the solution is slightly more complicated. Full-disclosure: it has been a minute since I have developed in Python and my skills are a little rusty. Fortunately, most developers provide sample launch files and include the variables that can be adapted to individual use cases.
The second change is that ROS 2 uses a different middleware for communication, specifically the Data Distribution Service (DDS). The switch to using DDS is to improve performance and reliability. There are even Quality of Service (QoS) policies in place now. Presently, the default DDS is Fast, but Cyclone is another possibility. In my experience working in simulation in ROS 2 Humble, there was an issue where the maps were failing to load in RViz2 when using FastDDS. The solution at the time was to switch to CycloneDDS. While the issue has probably been resolved by now, I have not had any further issues using CycloneDDS. If using Jazzy, ZenohDDS is another possibility as well.
The third major change is replacing the move_base package with Nav2. The main difference is the inclusion of behavior trees with Nav2. Although the use of costmaps and path planners is retained, the path planners have been updated to include smoothers and pruners for navigation. The fourth and final major change is the switch from Gazebo Classic to Gazebo Simulation. In ROS 1, Gazebo Classic was tightly integrated into the ROS 2 architecture. However, in Gazebo Simulation, a bridge is required to transform the Gazebo topics into ROS messages. The utilization of a bridge also offers the ability to use other simulation packages with ROS 2 in addition to Gazebo.
Note that ROS 2 has been developed concurrently with ROS 1 since 2017 and is on its ninth release. However, with ROS 1 going End of Life in May of 2025, there has been a recent push to transition to ROS 2. ROS 2 is even expanding into the space community for exploration of other worlds. Note that Space ROS Jazzy 2025.04.0 was just released.2 Demos for space ROS include the Canadarm. The Canadarm is the big robot arm that was deployed from Space Shuttles and the Mars Rover. There is even code for running a space station.3 Specifically, the demo recreates the ISS Nauka incident for fault analysis. Although both of those topics are outside the scope of this article, they demonstrate the capability that ROS 2 offers. At the time of writing, there are two ROS 2 versions available, specifically Humble Hawksbill and Jazzy Jalisco. Of late, I have been developing mainly in Humble and this will be the focus for the remainder of this article.
As a reader, I know what you are thinking. If ROS 2 can really do that, it should be able to play Doom too. Well, in short it can. The code for Doom ROS can be found here.4 The code comes prepackaged in a Docker container for easy installation and runs with the following command: ros2 launch doom_ros doom_ros.launch.py
Note that the joysticks currently tested are 8BitDo SN30 Pro +, Logitech F710, and DUALSHOCK 4 (PS4). However, a bag file is also included in the repository. Rather than install the full repository, I choose to work with the bag file. A ROS bag file is a way to record ROS data over time. One can replay the bag file and remap the topics to other ROS applications.
For this article, I ran the Doom ROS through a visual odometry package. Specifically, I chose the stella_vslam_ros ROS visual odometry package.5 The stella_vslam_ros package is designed to ingest camera topics and output the pose of the camera as the camera moves. However, if you use it with the Doom ROS bag file, it can track the character's position throughout the level.
The stella_vslam_ros package was compiled from source in my ros_ws/src folder. This was accomplished using the following commands:
$ cd ros2_ws/src $ git clone https://github.com/stella-cv/stella_vslam.git $ cd .. $ colcon build --symlink-install |
Once stella_vslam is complied and the Doom bag file downloaded, then to get everything running, I ran the following commands:
# In Terminal 1: $ ros2 bag play /path/to/bag/doom_rosbag/doom_rosbag.db3 \# spacebar pauses/resumes playback # In Terminal 2: $ ros2 run image_transport republish raw in:=doom_image raw out:=camera/image_raw # In Terminal 3: $ export NO_AT_BRIDGE=1 $ export XDG_RUNTIME_DIR=/run/user/$UID $ ros2 run stella_vslam_ros run_slam -v /path/to/orb_vocab.fbow -c /path/to/doom.yaml --map-db-out /path/to/map.msg --mask /path/to/mask.jpg --ros-args -p publish_tf:=false |
The orb_vocab.fbow file can be found here.6 The doom.yaml file is provided below. The mask.jpg was something I created to prevent stella_vslam_ros from detecting features in the bottom of the Doom screen (i.e., ammo, health, armor, etc.) since it is relatively static. The image is binary with a top white rectangle on a bottom black rectangle created in a drawing program.
Camera: name: "RICOH THETA S 960" setup: "monocular" model: "equirectangular" fps: 30.0 cols: 320 rows: 200 color_order: "RGB" Preprocessing: min_size: 2 Feature: name: "default ORB feature extraction setting" scale_factor: 1.2 num_levels: 8 ini_fast_threshold: 20 min_fast_threshold: 7 Mapping: backend: "g2o" baseline_dist_thr_ratio: 0.02 redundant_obs_ratio_thr: 0.9 num_covisibilities_for_landmark_generation: 20 num_covisibilities_for_landmark_fusion: 20 erase_temporal_keyframes: false num_temporal_keyframes: 15 Tracking: backend: "g2o" enable_temporal_keyframe_only_tracking: false KeyframeInserter: wait_for_local_bundle_adjustment: false Relocalizer: search_neighbor: true LoopDetector: backend: "g2o" System: map_format: "msgpack" num_grid_cols: 47 num_grid_rows: 30 |
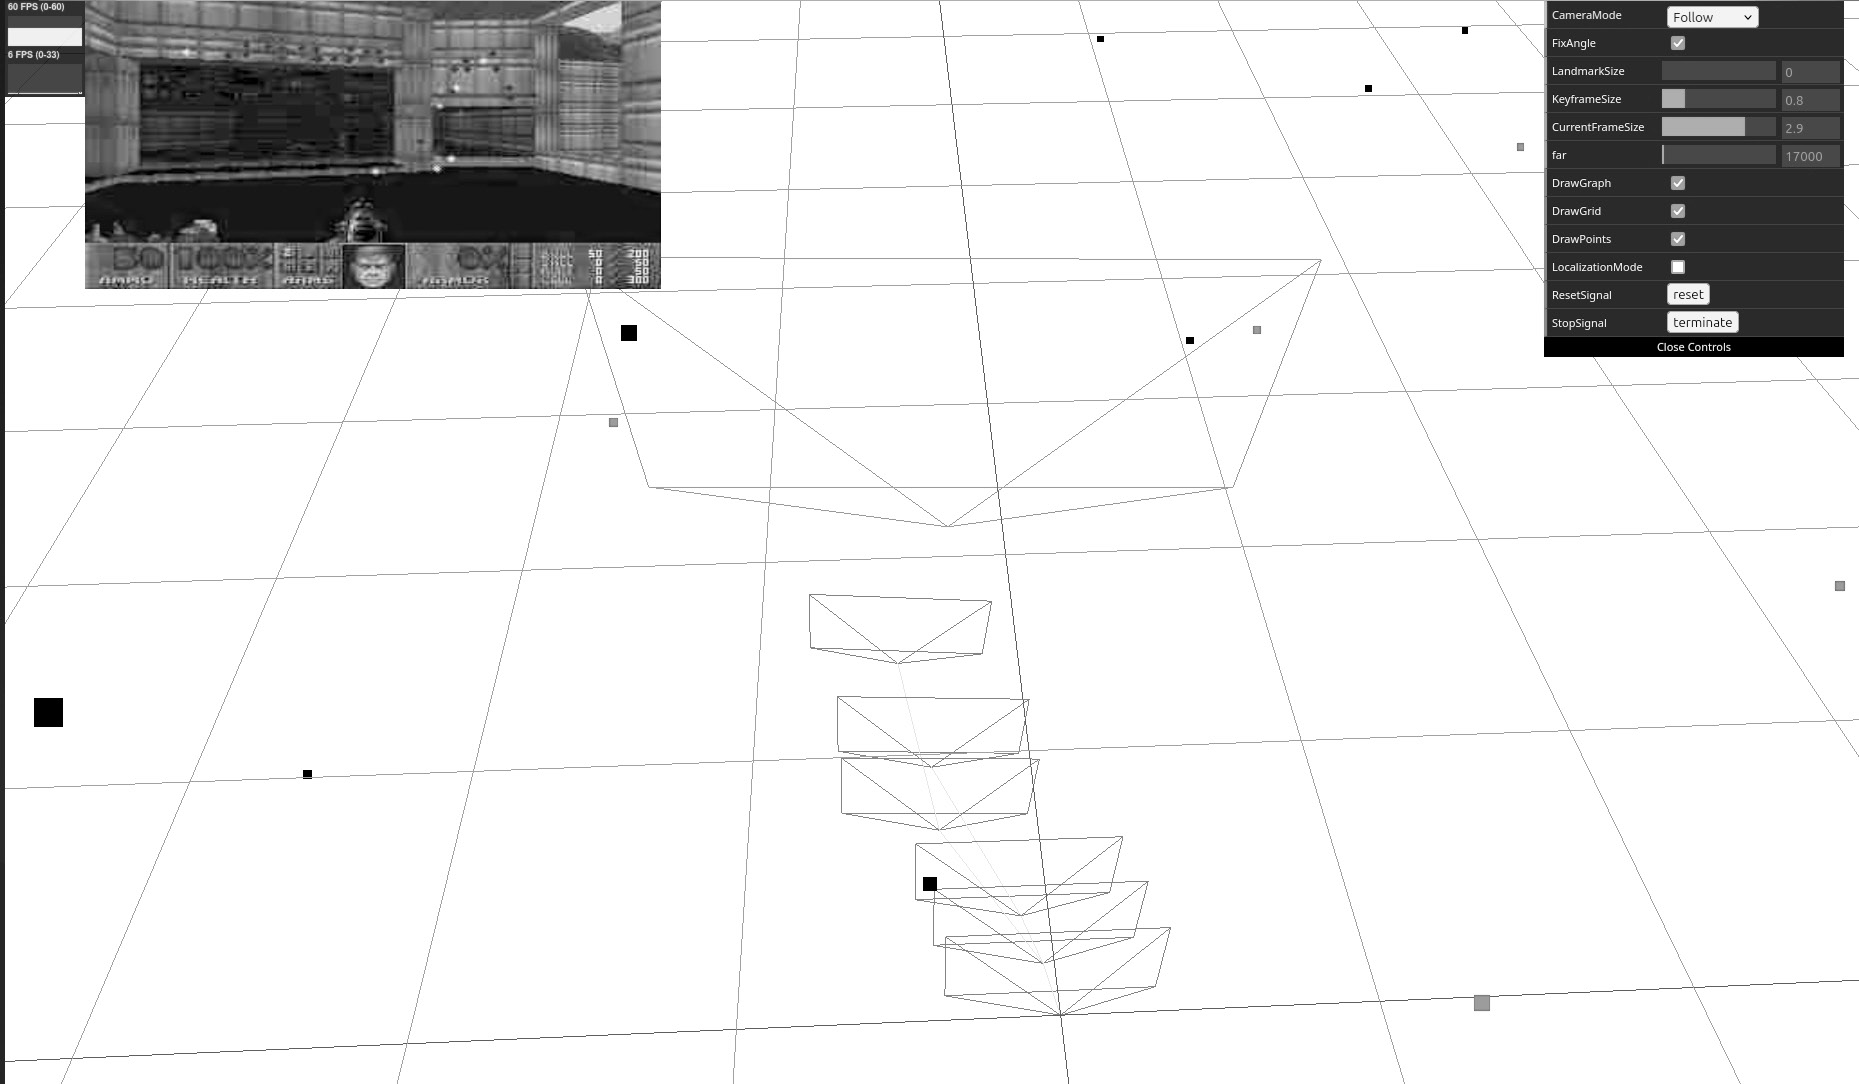
The results of running the Doom bag file though the stella_vslam_ros package can be seen in the image below. Note that the large frustum shows the character's current position. The smaller frustums show where the character has been. The light (current frame) and dark (map) dots are visual key features that stella_vslam_ros uses in its frame to map approach to track camera position or, in this case, player movement.
The Doom bag file is only for level one. Thus, installing the full Doom ROS repository is required to track character movement through additional levels. As an aside, stella_vslam_ros supports other inputs as well, including video files and image sequences, so it can be used with other games.
I hope you enjoyed exploring the capabilities of ROS 2. Stay tuned for future articles showcasing different ROS 2 capabilities, such as simulated environments, lidar odometry, and simultaneous localization and mapping.
- ROS Twitter Investigation (YouTube)
- Space ROS
- Space Station OS
- Doom ROS
- stella_vslam_ros
- github.com/stella-cv/FBoW_orb_vocab/raw/main/orb_vocab.fbow
Code: doom.yaml