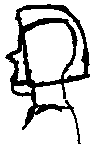
 From chin to chin around the back
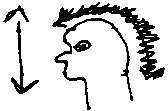 From top of head to base of neck
Editor's note: Sometimes shielding will work ok until they turn up the signal. Eleanor White says she tried similar shielding, which ceased to work. However she thought that someone with an implant might be subject to older technology than direct-to-skull beams and might be able to block the transmission to and from the implant.
Dear Cheryl [Cheryl Welsh]
I realized I have been doing something really stupid with this mind control stuff, especially considering my microwave radio background, but that just goes to show how much these jerks have been pushing me around and trying to keep me distracted from my options.
I realized even if I can't get the implants out I can block their transmission in a very simple procedure. It's call RF Shielding. Basically putting something that absorbs microwave energy over the implants in my head so that their projections don't get to me. Once I realized this, a quick trip to the hardware store and the fabric store and I had all I need. It was really interesting because their voices kept trying to find all sorts of things to try to distract me or make me upset to keep me fram finishing what I was doing.
My first attempt was pretty pathetic for fit but it proved I was on the right track because what I did was try to make a hat with layers of screen and cloth but I got the measurements all wrong but I put the contraption on and I could instantly feel a reduction in the tingling in my head.
Basically what I'm basing this off of is when I was working with microwave we had severe problems with interference of stray signals screwing up our tests, so we had to build what is called a Faraday cage to block out the signals. It is a box with the inside and outside completely covered in wire screen. The outside surface and inside surface are separated by wood to keep them isolated and each wall has its own ground driven into the earth. The screen absorbs the stray signals and blocks them so that we could make our tests.
I followed this same procedure minuss the ground rods because this is impractical.
I found that 4 layers of screen seemed best so far and even adding the cloth separators helped -- which makes sense -- because if all 4 layers of screen touch they make 1 big antenna.
What I did was make a hood like you see on a hooded sweatshirt and to make this thing look "natural" you can actually attach this hood to a sweatshirt so that you don't stand out like a sore thumb and look like a dork. The more odd we look the easier it is for others to justify their claims that we are just a bunch of loonies making this all up. Even if we do have miles of evidence and x-ray proof.
Once I was finished and cinched it all down tight about my head there was blessed silence. Instantly. God, I haven't realized how cluttered my head has been with their babble. I even tested it in my vehicle where they really like to bother me because they want to know where I'm going and what I'm doing. Silence -- blessed golden silence for the first time in years.
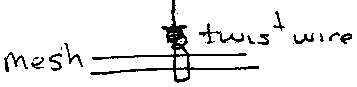
So here are my building instructions for others to follow and make one of these for themselves. Please post it on the MCF Forum. I may even be persuaded to help build more of these for others -- it works with a tape measure. I took 2 measurements of my head.
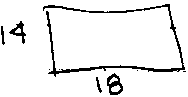
From chin to chin around the back
From top of head to base of neck
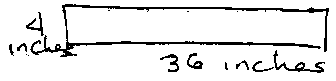
Then I started with the screen and cut out rectangles.
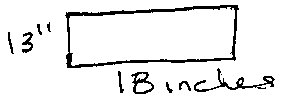
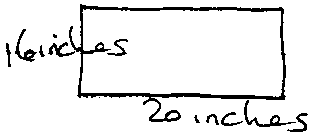
For me the measurements came out as 18 inches around the head and 13 inches up and down. This actually turned out a little large but you want that so you can trim it down to fit. Always make it slightly too long. It's easier to trim down than to add extra.
Then I folded it in half carefully -- bend is a better word; fold leaves a crease you don't want -- and cut from the top center along fold down 4 1/2 inches.
Then I cut a curve starting an inch above where I stopped with the first cut.

This way when you fold it over you have overlap to stitch together.
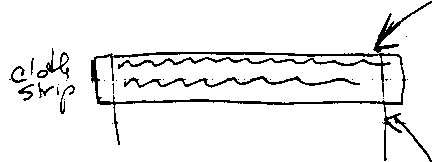
When opened it should look like this:

Almost forgot duct tape! Very important to keep all the sharp edges from poking you. I got a thin plastic vesion so it was easy to poke the copper wire through for stitching. Cover all sharp edges with this -- what I did was cut the tape in half lengthwise so I had long thin strips:
Roll of
tape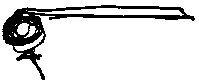 Cut tape down
center
Cut tape down
center
Thin strips conserves tape. I was using a leftover roll, but also I wasn't sure I could sew through the tape and so I wanted only narrow tape along edges so I could stitch the sides together.
Then comes the tricky part -- with this I didn't cover the curved edges with tape intil after I was done, but others may want to. I stuck myself a few times with the wire and have a few scratches for my efforts.
Take the bare copper wire and cut a length about as long as one arm. Then carefully fold the cut screen edges so that the curved part overlaps by the 1 inch. If you have someone or something to help hold it it may make things easier.
 2 curves overlap
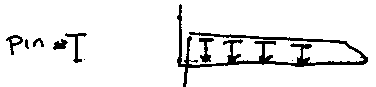
Then at the bottom of the curve I poked the copper wire through the mesh, then made a "fishook" with the end and poked it back through:

I twisted the smaller end of the wire around the wire to keep it anchored:
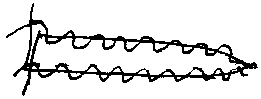
Then, carefully keeping in the center of the 2 pieces of mesh I used the copper wire to "stitch" it together:
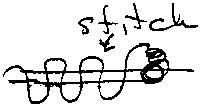
Do not do this with thread as it will not hold. Thread will tear or break.
Be careful to keep the wire straight -- if it twists it will make it difficult to pull through the mesh.
At the end I wrapped the wire in real small loops a few times to anchor it and trimmed off the ends.
Then I took a couple of big strips of duct tape and covered the curve to cover over all the pointy little ends of wire.
Should look like
this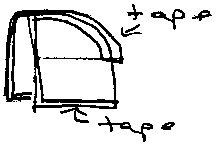
I did not do this next step but it may help. Along the front edge cut little notches and then overlap and stitch:
I found on my hood that when I pull it closed with string pull, wire doesn't bend like cloth so it ripples -- you want the hood as smooth as possible to cut out the microwaves trying to get at you. Even without it being smooth to the head mine cuts out 90% of their garbage.
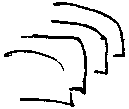
Make 4 of these hoods -- but on the 3rd and 4th ones add 1 inch to the height measurement
 because when you stack the hoods you want them to overlap;
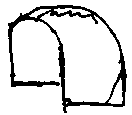
if not, they will look like
this: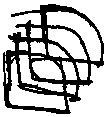 If you add 1 inch they should even up
better.
If you add 1 inch they should even up
better.
Next for the cloth you will do the same but you will add a few inches for seam allowance.
You will do everything the same as with the wires but this part should be less pain and trouble -- especially if you have access to a sewing machine.
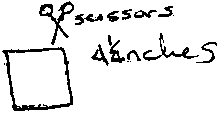
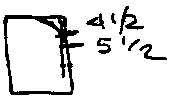
Cut cloth like before but do 5 1/2 inches and start the curve at 4 1/2 inches.
Then fold to halves over each other and with pins pin together flat with 1 inch overlap as best as possible.
With the machine or by hand sew along each edge of cloth about 1/4 inch from the edge.
I flipped the cloth over to see the secord edge.
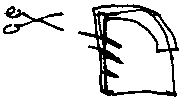
Trim off any excess with the scissors.
You should have a hood that looks like the metal ones.
 Make 5.
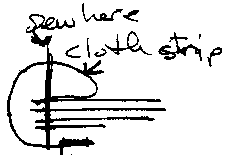
Next step -- take all 5 cloth hoods and match up their front edges and cut an extra strip of cloth.
Pin all of these layers together; make sure they stay straight!
You want to sew 1/4 of an inch close to the edge.
If the cloth strip overlaps that's okay. You trim it later when you are done.
Then sew a second line 1 inch in. This gives you a good solid front edge and makes a channel to put your shoe string in to make your "pull" to close the hood.
Next, fold the cloth strip over to the bottom side. Trim the extra off.
This covers all your edges so they will not unravel and, like I said, should leave a 1/2 inch channel for your pull string. Feed the string through with a safety pin.
Next step: carefully separate layers of cloth and insert metal hoods in the pockets you've created.
Stop -- try it on for fit !!!
For me I found it was too long in the back and I could not move my head so I trimmed 2 inches off the back edge for a better fit. You will have to trim for you own measurements. All numbers here are for what I made for myself.
Make sure each hood is set properly in its pocket so that the edges all line up.
Once you have all the measurements exact so that it fits well you can finish closing it and attach it to the sweatshirt.
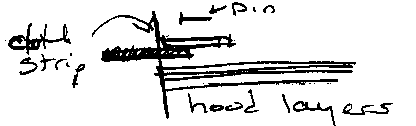
Note: you want to cover the entire skull and want in the back to slightly overhang back of the skull for coverage but not so much that it hurts or you can't move your head. The cloth will be much longer -- do not cut -- use this to attach it to the sweatshirt.
When everything fits well run a line of sewing right under the back edge of mesh through the cloth.
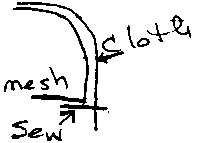
This will hold the metal parts in your hood so they don't slide. I also put a drawstring under this as well to cinch the back down because this is the important area where most transmitter/receivers seem to be.
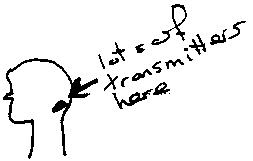
That is why this area needs to be covered.
Attach the bottom edge to the sweatshirt and you are ready to go. Put the hood on and tighten everything down and enjoy the silence.
For me this has been such a relief. As for the telepaths, I have learned to recognize them and ignore them and without their transmitters to force me to acknowledge them and force me to open up to them I can keep all the voices out because of the RF shield hood !!!