Last updated Wednesday, November 01, 2000
Copyright © 1998, 1999, 2000 - Neal R. Fildes
Warning - This version of trunker may make major changes to your data files. It is highly recommended that you save a copy of them in a safe place before using this program. You have been warned!
Some time ago there appeared on USENET a program and its source code that provided the rudimentary ability to decode Motorola Type I, II, and IIi trunking radio system data. This program is a major enhancement to that program, and is also in the "public domain" with no guaranteed support (only grassroots voluntary support.) It is totally free, and anyone attempting to make commercial use of it ought to get legal advice first. (I have heard an opinion from a scanner manufacturer that since we are not making a 2-way radio system with the patent, there is nothing Motorola can do legally... but I am not a lawyer, and I'd prefer not to finance one...)
This program, with its rich set of features, was made possible by a world-wide team of contributors who assisted by collecting data on existing systems, providing interface information for various types of scanners, testing beta versions, developing features, and offering feature suggestions. Special thanks are due IBM for making patents available on the WWW for all to share.
This is a maintenance release aimed at resolving a number of user complaints:
| Complaint | Method of Addressing Complaint |
| The system I monitor uses lots of frequencies, so the log area is not very long! | Removed blank line at bottom of frequency area, so one more log line is available. (not much but it's something...) |
| Type 1 radios end up with a data record for each subfleet they participate in, so I have to maintain multiple annotations for the same radio! | Radio identifiers will be stripped of the subfleet part of their ID (it will be set to zero). The highest-numbered annotated duplicate will be used to set the values for this record and the duplicate data will be eliminated. The call display will now always show the hex for the Talk Group for a type I call so you can use that ID for 'g' annotations. |
| The node #s shown in trunker.exe are off by 1 from the Motorola values! | New node numbering will now be used, and the file name will now be xxxxCn.txt instead of xxxxRn.txt. The old file will be left around. Node numbers will appear 1 higher than you are used to seeing. |
| I need to know which groups/radios are Astro or use encryption so I can lock them out easily or...! | An additional field is added to the data records to record information about encryption etc. It is the logical ORing of a number of conditions. For a complete definition of the data file formats, click here. |
| Sometimes when multiple radios affiliate the log gets filled up with
multiple entries! I set a radio to a high priority because I wasn't interested in it but it keeps filling up my log area because of signals/affiliations, etc! |
Duplicate checking of the log will now ignore the timestamp. This may
result in loss of some duplicate records you may have wanted to see, but the exact results
are in the data file. A new environment variable FILTERLOG can be set to 1 to filter out logging about radios/groups less then the Threshold. |
| Some variables are treated as 'set' even though I set them to '0'! | FILTERLOG, NOEMERGENCY, and TRACKDIGITAL will now require a value of '1' to trigger the feature. |
| When I am talking and I jump to a digital Group, the priority of my analog call follows me and trunker ends up listening to a digital conversation! | Corrected the transfer of the conversation priority from one talk group to another. |
| On my Type I system, the console appears on multiple talk groups at the same time. (side effect of new processing of Type I radio IDs)! | Trunker will now allow the (transformed) Type I radio ID to appear simultaneously in multiple Type I conversations. |
| Trunker always puts new radios at a certain priority, and I don't want to adjust the threshold to hear them! | A pair of new settings was added to specify the priority to be used for
new groups or radios when in SEEKNEW mode. The data file will still code them as '0'
priority. For example, when in SEEKNEW mode, new radios can be treated with a better
priority (like 5) and groups at 15 with the following settings in the environment data
file: NEWRADIO=5 |
| I can't see the display well on my system with the colors Trunker uses! | A new environment variable, TRACKCOLORS, allows the colors to be changed,
except for the flags area. A list of 6 numbers separated by commas is required. The
numbers are the same as used for group/radio/patch annotation. They are, in order: background
- used for the base screen color behind the text An example usage (close to default values): TRACKCOLORS=0,2,7,14,14,4 |
| The bright yellow for all the active frequencies distracts me from the areas of the screen that I consider more important! | The default colors have been toned down for the active frequencies. You can restore this behavior by using the TRACKCOLORS setting. |
| I'm writing a program to help manage the data files, but it is hard to tell if they contain hex or decimal sometimes! | The format for marking unannotated radios has change from New@... to [#xxxx]... or [nnnnn]... to allow a value to be recognized programmatically as hex or decimal. Also, the most recent group on which the radio transmitted or affiliated will be used for this value, not the first. |
| Trunker doesn't tell me what type of system I'm monitoring, it always says 'analyzing'! I'd also like to know the connect tone so I can associate frequencies I find with conventional scanning with this system by tone! | Revised the heuristics used to identify types. Also changed the information provided about a type to include the base signaling type (Type I, Type II, Type IIi), whether it is Net(work)cap(able) or Netw(or)k(ed), and the connect tone frequency. NOTE: Trunker cannot presently detect that a system is ASTRO until an actual ASTRO call is placed, nor can it tell if a system is IIi until it actually sees a Type 2 radio being used in a Type 1 capacity. After evidence is received, the type will be revised accordingly. |
| Trunker keeps changing my size 'L' bank code! | Corrected processing for patches in the largest 3 bank size codes. |
| What is the format of the data files? | See a new table documenting the format! (click here!) |
Please note that in the following documentation, changes from release 3.8.1 are indicated by underlining.
For those who already own a commercially available trunking scanner, Trunker can still provide helpful information for using that scanner. Four areas that may be valuable include:
For those who do not yet own a commercially available trunking scanner, Trunker can assist one in learning about how trunked systems operate and if they are used frequently enough to warrant purchase of an additional scanner.
A variant of Trunker called ETRUNK.EXE is also available for GE/Ericsson trunked systems. It shares the same user interface, features, and file formats as TRUNKER.EXE.
Since Trunker keeps a set of data files for each trunked system it monitors, it identifies them with a special field called the 'System ID' that is periodically broadcast by each system. It uses the SysId value to name data files and detect when the input scanner has moved on to another system. Since this SysId value is sent at intervals, it would be possible for some of the groups or IDs from the new trunked system to make their way into the previous system's data files. To avoid this, if Trunker senses a change of SysId field, it will not auto-save the data files from the previous system. The appropriate way to change systems and still have data saved is to use the 's' command to save the current system's data, then allow the scanner to search until the next trunked data channel is located.
The data files for a given system will be named with this SysId value. For example, if a system's ID is 1b27, files will be created with the names:
	1b27sys.txt	frequencies and bank map
	1b27page.txt	paging, group patch, and affiliation log
	1b27ids.txt	information on radio IDs
	1b27grp.txt	information on group IDs
	1b27Ptch.txt	information on multi-group patches
Larger trunked systems have a feature that allows a radio system to span a broad geographic area by supporting an array of radio nodes. Each of several repeaters in the large geographic area will be assigned its own set of frequencies distinct from nearby repeaters in the system. However, each repeater will broadcast the same SysId field and work from the same database of Group and Radio IDs. Trunker mimics this behavior and allows the frequencies from each repeater to be saved in a separate file, yet uses the common data base of Group and Radio IDs.
In addition to the above file names, you will see a file for each of the repeaters in the system that you have monitored. Example file names would be:
	1b27C6.txt	frequencies for Repeater Node 6
	1b27C8.txt	frequencies for Repeater Node 8
	...
Note that if these files are used for a given system, the xxxxSYS.TXT file be over-written with a 3-line version containing ONLY the System Title, Bank Map, and Band Plan. This allows the Bank Plan from the last used repeater to be propagated to an new repeater file that is created. Sometimes, various repeaters may have a different band plan, especially with plans '8' and 'S'..
Also, after Trunker was widely disseminated, it was brought to our attention that this numbering scheme was 'off by one', with the user version starting at one instead of zero. This difference has been corrected with this version.
Trunker will now detect the use of a type-II radio within a bank designated as type-I. When this occurs, Trunker will revise the bank letter for that bank to lower case (H becomes h) to indicate its use for both types of radios. Trunker will attempt to display the true type-II id of the radio instead of its type-I alias when possible. However, limited accuracy of the received control signal can make this impossible. Although Hybrid and type IIi systems are different in the appearance of the data stream, Trunker classifies them in the same way and provides the same treatment for the banks utilizing mixed radio types.
Rather than requiring that many command line arguments be used for parameters that are relatively static, Trunker uses environment variables. In addition, because most systems tend to run out of environment memory unless tunable parameters are changed, Trunker supports the use of a single variable containing a file name in which the rest of the variables may be placed.
It is Highly Recommended that you set only the TRACKENV variable and put the rest in a text file! Problems caused by variable settings not 'taking' dominate the trouble reports for this version of Trunker and you can avoid many problems by using this approach!
The following table shows the variables used by Trunker:
| Variable Name | Use | Allowed Values |
| TRACKENV | The preferred method for passing variables to Trunker is to place a file name in this variable. The file would contain all the following variables in a NAME=VALUE format. (The "set " command normally used in a .BAT file is not needed.) | Any valid text file name. Example: set TRACKENV=c:\trackenv.bat |
| TRACKSCANPORT | The port to which the second, tracking scanner is connected | COM1, COM2, COM3, COM4 |
| TRACKSCANBAUD | The baud rate at which commands are to be sent to the second, tracking scanner for jumping between audio channels. The scanner must accept the same setting. | 300, 1200, 2400, 4800, 9600, 19200, 38400, 57600, 115200 |
| TRACKSCAN | The type of scanner used for audio tracking. | PCR1000, R10, R7000, R7100, R8500, AR8200, AR8000, AR5000, AR2700,AR3000, AR3000A, KENWOOD, KENWOOD9600, FRG9600, BC895, BC245, OPTO (OS456, OS535), OPTOCOM, NONE (For CI-5/CI-V based radios, please see the Table of Addresses at the end of this document!) |
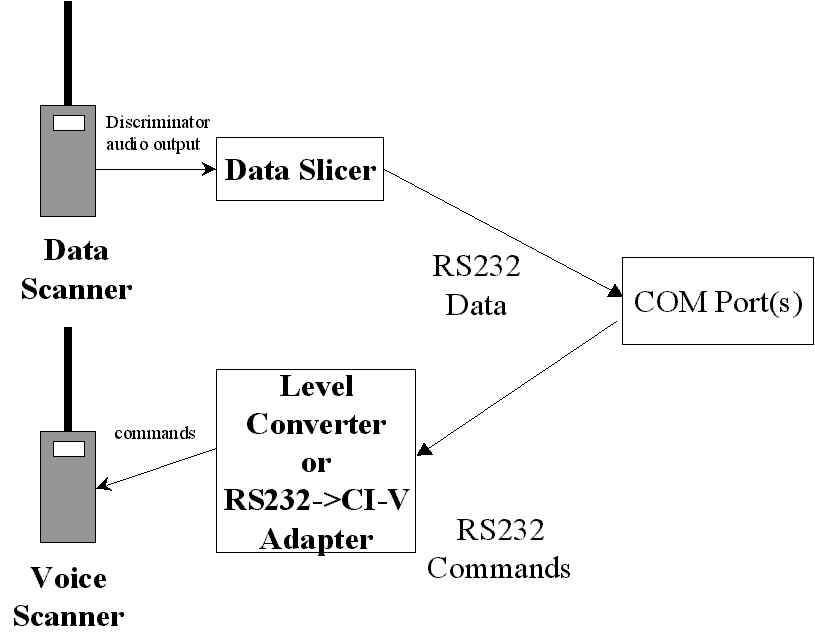
| TRACKSLICERPIN | Pin for input from the Data Slicer. If this is incorrect, the proper setting can be determined from within Trunker using the 'C'onfig menu. | CTS, DSR, DCD |
| TRACKSLICERPORT | The com port to which the data slicer is connected (via the input lead specified in the TRACKSLICERPIN variable.) | COM1, COM2, COM3, COM4 |
| TRACKSCANPARK | Set this variable to a frequency that normally has no traffic, or which you would want to monitor if no trunked traffic is active. Trunker will switch to this frequency when no calls are present or none of the active calls have a priority <= 50. By specifying this value, you can eliminate the possibility that Trunker will park on a frequency that has an active conversation but which you do not want to monitor. | example: 854.0000 or any other frequency reachable by the scanner without changing from NFM mode Some users report problems with frequencies less than 100MHz for this variable with BC895XLT as the controlled scanner.. |
| NOEMERGENCY | Set this variable if you wish to suppress special processing of Emergency calls. At least one Trunker user reported that on their trunked system an emergency button may stay uncleared for hours! | 1 to enable this option |
| TRACKDIGITAL | Set this variable if you want Trunker to follow digital and encrypted calls instead of treating them as un-scannable. | 1 to enable this option |
| TRACKSLICERMODE | Indicates whether the input should be inverted or not. Usually INVERT for inverting data slicer circuits. Trial and error may be necessary to determine the proper setting. If you used the /I flag with Trunker 3.42 or higher, this should be set to NORMAL. However, some Trunker users report having to reverse this option for UHF systems. If this setting is incorrect, it can be temporarily adjusted using the 'C'onfig menu. | NORMAL, INVERT |
| FILTERLOG | When selected, limits logging of data for radios/groups/patches to those items with priority <= the Threshold setting | 1 to enable this option |
| NEWRADIO | When in SEEKNEW mode, treats new/prty=0 radios as if they had this priority. This can help you pick up radios that only seem to participate in I-calls. | a number between 0 and 99 |
| NEWGROUP | When in SEEKNEW mode, treats new/prty=0 groups as if they had this priority | a number between 0 and 99 |
| TRACKCOLORS | Allows you to adjust the colors used by Trunker. Includes a
list of exactly six colors. These colors are designated (in order of appearance) background
- used for the base screen color behind the text An example usage (close to default values): TRACKCOLORS=0,2,7,14,14,4 |
a comma-separated list of exactly six color numbers, between 0 and 31. This allows the 16 colors listed below (0..15) + 16 for blinking (or equivalent representation on your specific display card.) |
None - if you provide any, a list of environment variables will be printed out.
First, identify which signal lead (DSR, CTS, or DCD) the slicer signal is wired to, then edit a .txt file containing your environment variables. A good way to check your data slicer and determine its configuration is a freeware program called SLICER.EXE. Once you know which pin is used, set up the configuration. First, create a global file that contains the variable settings you want for Trunker. It is best to use this file rather than put 'set' commands in autoexec.bat because it is easy to exceed the limits on environment space. Here is a sample "TRACKENV.TXT":
	TRACKSLICERPORT=COM1
	TRACKSLICERPIN=CTS
	TRACKSLICERMODE=INVERT
	TRACKSCANPORT=COM1
	TRACKSCAN=AR8000
	TRACKSCANPARK=854.0000
	NEWRADIO=10
	NEWGROUP=8
	FILTERLOG=1
Next, refer to this file via a SINGLE variable setting in AUTOEXEC.BAT. Assuming this file's name is c:\trackenv.txt, place the following line in AUTOEXEC.BAT and reboot:
set TRACKENV=C:\TRACKENV.TXT
Running Trunker in a DOS window (on a fast WINDOWS system) or under DOS, you should see a 43-line Trunker display:
Next, tune the input scanner to the data channel of the trunked system to be analyzed.
After several seconds, the display should look something like this:
If, after 10-20 seconds, you see a status field of wantCTS, for example, it means
that the TRACKSLICERPIN variable is incorrect. You can use the 'c' command to enter the
CONFIGURATION menu, which will allow you to select the various input pins and polarities
to find the correct settings. Once you have identified these, you can go back and change
the values of TRACKSLICERPIN and TRACKSLICERMODE for subsequent runs. Some Trunker
users have noted that the normal/invert modes may need to be set on a system-by-system
basis!
At this point, Trunker has determined many of the key parameters of this system. Since a call is in progress, Trunker is beginning to identify the voice frequencies in use. The system ID is 1f3e, and that code will be used to name the .txt files Trunker saves. This system either has a single repeater site, or multiple sites that all broadcast simultaneously on the same frequencies. The call in progress shows that the first bank (of 8) is a Type-II bank.This is saved in the 1f3eSYS.TXT file with the string MAP=2???????. The current call is for group (decimal) 3536 (or hex 0DD0 or Motorola Style 0DD). If one were to annotate this group by typing g0dd0Police Dispatch<return>, the line would read:
v857.2375* 49 Police Dispatch
#0dd0 G ----
Once Trunker sees traffic on all of the active voice frequencies and identifies the
data channel frequency, the list will look something like this:
Type II 97.3 Hz
Scanner: AR8000 Status: Hi-Qual Acc:
83.0%
SysId: 1f3e Type: 2??????? Title: UnNamed System
Output Pr
Trunker <version>
Frequency ty Destination Title
ID T ID
Caller Title
cdv-------- -- -------------------- ..... ---- - ---- --------------------------
v856.7625*49 ?
#0730 G 149e ?
v857.2375
v857.7625 49 ?
#0a90 G 206c ?
v858.2375
v858.7625 49 ?
#0110 G 13e9 ?
d 859.7625
If you edit the flat files produced by Trunker (either offline via text editor or
database system or online with the 'g', 'i', and 'p' commands,) adjusting priorities and
colors, you can get a display something like this:
Type II 97.3 Hz                 Scanner: AR8000     Status: Hi-Qual Acc:  85.3%
SysId: 1f3e Type: 22222222 Title: Warren County SmartNet-II
   Output   Pr                                                 Trunker <version>
  Frequency ty Destination Title           ID  T  ID  Caller Title
cdv-------- -- -------------------- ..... ---- - ---- --------------------------
c v856.2375
  v856.7625*01 Mutual Aid                #0590 G 14ec B P Mutual Aid ???
  v857.2375
 dv857.7625 06 WCCC Primary              #0170 G 1c04 P P Waynesville 1/2William
  v858.2375
 dv858.7625 08 M F Springboro 2101       #16b6 I 16a9 M F Springboro 2103 Car
  L859.2375
 dv859.7625
  L860.2375
 dv860.7625
Referring to the next (color) screen shot, the police entries are blue, the fire / public safety entries red, and any shared group (mutual aid) magenta. I've distinguished between nearby organizations (bright blue or bright red) and less interesting ones (dark blue, dark red.) You can also see from this example that it is possible to re-arrange the frequencies in the xxxxSYS.TXT file and Trunker will maintain that ordering. I have manually added the frequencies with the 'L' in the voice column, indicating that the system is licensed to use those frequencies. However, should the system ever actually use them, Trunker will substitute a 'v' for that column, and I would then know that they have been placed in service. Finally, note that many systems change data channel frequencies daily or at random, so you will not necessarily have four 'd' entries at first. You may have to search for the data channel on another day, first checking the known voice frequencies, then trying other frequencies within the pattern.
Here is a (partial) live screen shot of Trunker in action, monitoring the Warren County, Ohio system:
With your scanner locked onto the data channel to be investigated, start Trunker. Once Trunker locks in on the signal, it will show the system ID and begin to collect information. If Trunker has already seen that system, it will retrieve the data files previously saved and note the use of the current frequency as a data channel. As there is activity on the system, it will step through the voice channels available. In order to fully collect information on the system, it may be necessary to find the system's data channel again on a number of days until all of them have been found (a maximum of four frequencies are used). If you want to look up the licensee for the system, wait until the CWID channel appears (a 'c' in column 1), then monitor that frequency until the callsign is heard. In larger systems, the first channel is often not used for voice traffic, so the only way to find the CWID channel is through the data channel "diagnostic" command.
By default, Trunker will interpret frequency assignments according to a "standard" 800MHz map. Use the following process to initialize the xxxxSYS.TXT file for 900MHz, UHF systems, splinter 800MHz arrangements, or other systems that do not conform to the standard mappings:
While using one scanner to monitor the data channel with Trunker, simultaneously monitor the frequencies it has exposed with a second scanner (or better yet, if you have a supported scanner, hook it up and use the tracking feature.) By simultaneously listening and watching, one can associate the conversation (especially unit designations) with a specific voice ID, and collections of users doing a particular activity (such as fire dispatch) with a group ID. Using the 'G' and 'I' commands, one can quickly add information to Trunker's data base in real-time.
To get a comprehensive list of groups and IDs, it is also possible to let Trunker run for days as necessary. For this to work, the scanner that is monitoring the data channel must be programmed with all of the data frequencies Trunker exposes and set up with proper squelch etc. so when the data channel changes frequency, the scanner will skip to the new one.
Once one has identified a group as having a specific function, Trunker will automatically annotate any new radios as having used that group the first time the radio was seen. One can than fine-tune the xxxxIDS.TXT file online with the 'i' command to set priority, color and title, or offline with a text editor.
Over time, should radio IDs get re-used, it is easy to notice a discrepancy in the display and update the annotation without stopping Trunker.
Recommended settings for this mode include Delay,not Verbose, and seekNew. If you use the audio scanner in trunk-tracking mode while using these settings, the program will give highest priority to the unknown group IDs to assist in identification. Once you have identified a group or user, you can use the 'I' or 'G' command to note its use and set its priority to a non-zero value, preventing future jumps to that group or user unless it is associated with call to a group or individual with a scannable priority.
The recommended approach for analyzing a new system is to first monitor the talk groups with the 'Verbose' option turned off and 'seekNew' turned on. Once you have the majority of talk groups identified, prioritized, and colored, then turn on the 'Verbose' mode. At this point, as each new radio is identified, since the talk groups are already annotated, each radio will then be assigned a text string noting the first talk-group it is seen on. As you see a white radio entry, you can then update its text string, priority, and color as appropriate. The seekNew option only seeks to new GROUPS so these new radios will not interfere with your monitoring process.
Sometimes a multiple group call is set up from one of the trunked system consoles. Each 'Patch' as it is referred to by Trunker, has a unique patch id and a list of associated group IDs. While that patch is being broadcast over the data channel, any calls by one of the participating groups' radios will be processed specially (based on the low 8 bits of the group ID known as 'flags'.) The text associated with the patch will appear with a 'P' in the T(ype) column. You can edit that text with the 'P' command after you enter the hex Patch ID.
If you have not edited a Patch record, the patch record will take on most of the characteristics of the participating group with the best priority.
If the patch occurs in a Type I bank, you will instead see the Group ID and Radio ID of one of the participating members, but you can see the list of participants in the Log window (and the xxxxpage.txt file if disk Logging is turned on.)
Two features of Trunker are intended to support the collection of data about the users and groups in the trunked system.
[#0170]WCCC Primary
This annotation is what would appear if the display format was HEX, and the radio in question last used group 0170(hex) titled "WCC Primary". When the display mode is changed, these annotations will be modified to contain a decimal code.
The audio scanner can be used to track the channels based on priority by hooking the TxD lead through a level converter to the serial input of the scanner. The scanner should be hooked up prior to starting Trunker. Trunker will put it into VCO mode, set the step, and drive it with the proper frequencies. Assuming one has already identified groups and IDs, and would not want to snap to new ids, you probably don't want the seekNew option set. The Delay and Verbose settings could be used according to user preference. Note that the equivalent of 'locking out' groups or IDs is accomplished by setting the priority for the groups and IDs greater than 50.
| Field Name | Values | Meaning |
| <none, used to be Flavor> | old Type I | This is an older Type-I system that is limited in function. It does not broadcast the types of data words that would be necessary to support multicast or networked operation. It will normally take 10-30 seconds for the system ID to be determined for this type of system since the ID is not broadcast very often. |
| Type I | Normal Type I system, only has feature set recognized by Type I radios. | |
| Type II | Normal Type II system, may be single site or Multicast, and may serve type I radios, Type II radios, or a mixture of both. May be a Type IIi system but trunker has not observed any evidence of IIi behavior. | |
| Type IIi | A Type II system where one or more banks are Type 1 and a Type 2 radio has been detected masquerading as a Type I radio. | |
| Type II Astro | A Type II system with ASTRO features. | |
| Type xxx NetCap | System is capable of being part of a multiple-site network, where each repeater would have its own set of frequencies. This value may appear momentarily before Trunker observes an indication of the existence of neighboring nodes/sites. | |
| Type xxx Netwkd | This networkable site has broadcast information about its peers so is believed to be part of a networked system. | |
| Status | DX Rcv | Accuracy of the data words received is <= 80%. A stronger signal would improve performance of Trunker. |
| Hi-Qual | A received data accuracy > 80% indicates Trunker will monitor this system effectively. | |
| sig?inv | A signal appeared at the requested input pin but either is not present (check input scanner) or the invert option needs to be reversed. | |
| wantCTS, wantDSR, wantDCD | The selected pin does not have a signal on it. Check connection or try other input pins until you identify where your slicer applies the signal. | |
| T (call type) | G,H | Group call - any radio affiliated with that group receives the audio as a 'broadcast'. 'H' indicates a hybrid call where a Type-II radio is accessing a Type-I bank. |
| I,F | Individual or other call - radio traffic not related to a 'Group' broadcast. | |
| E (blinking red) | Emergency call - A radio user affiliated with this group has pressed the EMERGENCY button and has not yet reset it. Unless the 'NOEMERGENCY' variable is set, the appearance of this type of call will be accompanied by a long, medium-pitch speaker tone. | |
| A | All Talk Groups | |
| P | Patch - multiple groups are logically associated and all radios affiliated with all groups in the Patch can hear the sender as a 'broadcast' | |
| M | Multi-Select - multiple repeaters are participating in the call, one for each associated talkgroup | |
| g | Encrypted group call | |
| e (blinking red) | Encrypted emergency call. | |
| a | Encrypted ATG | |
| p | Encrypted Patch | |
| m | Encrypted multi-select | |
| Gd, gd, Ed, ed, Ad, ad, Pd, pd, Md, md,Id,Fd | The small 'd' next to one of the above letters indicates a digital call. | |
| Type | ???????? | Trunker has not seen evidence that any of the banks are Type-II, and the flat file has not been modified to specify any Type-I banks. |
| '2' in a column | That bank has been observed to be a Type-2 bank, or the flat file has been edited to request that Trunker treat it that way. | |
| a letter between 'A' and 'N' in a column | That bank is to be interpreted as a Type-1 bank. See the Fleet Map Table below. *** These are NOT the Motorola Bank Size Codes *** | |
| a letter between 'a' and 'n' in a column | That bank is a Type-1 bank in which Type-2 radios sometimes participate using special command signals that are part of a Type IIi system. | |
| PLAN | 8 | 800 MHz "Standard" plan - varied - for fnum = 0 through 0x2CF, 851.0125 + .025*fnum, for fnum = 0x2D0 through 0x2F7, 848.0000 + .025*fnum for fnum = 0x32F through 0x33F, 846.6250 + .025*fnum for fnum = 0x3C1 through 0x3FE, 843.4000 + .025*fnum for fnum = 0x3BE, 868.9750 |
| S | 800 MHz "Splinter" plan - varied - for fnum = 0 through 0x257, 851.0000 + .025*fnum, for fnum = 0x258 through 0x2cf, 866.0125 + .025*(fnum-0x258) for fnum = 0x2D0 through 0x2F7, 866.0000 + .025*(fnum-0x2d0) for fnum = 0x32F through 0x33F, 867.0000 + .025*(fnum-0x32f) for fnum = 0x3C1 through 0x3FE, 867.4250 + .025*(fnum-0x3c1) for fnum = 0x3BE, 868.9750 |
|
| 9 | 900 MHz "Standard" plan - 935.0125 + .0125*fnum, fnum is 0 through 0x1DE | |
| 0 | non-standard - new frequencies appear in hex, and must be edited for customized mapping. |
Trunker 3 generates and later reads four or more data files, with names based on the 16-bit SysId value:
While Trunker is running, keystroke commands control various operating parameters and saving of data. When the data files are saved, the current settings of toggled options (NVDXLF) are saved in the xxxxSYS.TXT file. The keystrokes are:
Note that the menu may take more than one line, so the 'space' key will switch between menus. A particular menu item need not appear to be accessible - the keystrokes will work whether the particular item is visible or not.
When you enter the 'G', 'P', or 'I' key, you will be prompted for the group, patch, or radio ID (in hex or decimal depending on the current format setting.) Type in the hex(or decimal as appropriate) radio, group, or patch ID. Do NOT try to type in a textual Type 1 Group Annotation, such as "3 02-12". For a Multi-Group Patch, type in the 4 or 5 character patch ID, as seen on the displayed call or observed on the paging/patch log window.
After typing the last character of the ID, or hitting ENTER or TAB after less than 4(or 5) characters, Trunker will display the current data record. You may edit the Title, Priority, and Color fields. To move to the next field, use the TAB key. To move within a field use the left and right arrow keys. Backspace is destructive, and the Insert and Delete keys function in the normal manner. You may either abort the current update with the <escape> key at any time, or commit the changes without tabbing through the remaining fields by using the ENTER key. Also, the Right Arrow key can be used to skip from the last column of a field to the first column of the next, but you cannot go back with the Left Arrow key.
When you reach the 'color' field, a colorized prompter will appear on the bottom line of the screen to help you select the proper color code. You can add 16 to the value shown for blinking, and/or add 32 to the value for a 'beep' from the speaker. Note that whatever color is the background color will not be seen in that menu, since it 'blends in' to the background.
This area of the screen contains static data about the frequencies used by the system, and real-time information about the current state of the various frequencies. 43-line mode is used to allow the full 28 (27 voice + 1 CWID) frequencies to be displayed. Only those frequencies actually used for voice, data, or CWID are retained in the xxxxSYS.txt file. In the channel area, the first three columns carry flags about the particular frequencies:
Each frequency identified (possibly in past sessions as saved in the xxxxSYS.txt file) is color coded:
Subsequent columns include:
This zone consists of two lines, the first for prompting, and the second for displaying the results of the last entered annotation request.
NOTE: These are NOT the Motorola Bank Size Codes!
| Size | Use Letter (upper case for Type I, lower case for IIi or hybrid banks) |
#Banks covered |
#Fleets | #Subfleets per Fleet |
#Radios per SubFleet |
Notes |
| S-0 | 2 | 1 | n/a | n/a | n/a | Type-II Bank |
| S-1 | A or a | 1 | 128 | 4 | 16 | |
| S-2 | B or b | 1 | 16 | 8 | 64 | |
| S-3 | C or c | 1 | 8 | 8 | 128 | |
| S-4 | D or d | 1 | 1 | 16 | 512 | |
| S-5 | E or e | 1 | 64 | 4 | 32 | |
| S-6 | F or f | 1 | 32 | 8 | 32 | |
| S-7 | G or g | 1 | 32 | 4 | 64 | |
| S-8 | H or h | 1 | 16 | 4 | 128 | |
| S-9 | I or i | 1 | 8 | 4 | 256 | |
| S-10 | J or j | 1 | 4 | 8 | 256 | |
| S-11 | K or k | 1 | 2 | 16 | 256 | |
| S-12 | L or l | 2 | 1 | 16 | 1024 | spans 2 banks(0-1,2-3,etc.) Trunker does not 'enforce'! Typical use is ??LL???? |
| S-13 | M or m | 4 | 1 | 16 | 2048 | spans banks 0-3 or 4-7 where used. Trunker does not 'enforce'. Typical use is MMMM???? or ????MMMM. |
| S-14 | N or n | 8 | 1 | 16 | 4096 | spans all banks when used. Trunker does not 'enforce'. The only use for this code is NNNNNNNN. |
System Label on first line
MAP=222C2222		bank size map
PLAN=8			800MHz 'Standard' US Band Plan
DISPOSITION=...		per-system settings from 'option' sub-menu
OPTIONS=NVDf		per-system settings from 'main' menu
c v854.8875,9b,ffff,323	first 3 columns are flags, then freq. in MHz, then 'channel #'
  v855.1875,a7,ffff,333	4th column is 'input frequency' hex for certain
  v856.3125,d4,ffff,3f	UHF systems which emit input frequency codes. last is hit counter
  v856.4125,d8,ffff,1dd2
  v857.3125,fc,ffff,22f3
  v857.4125,100,ffff,3303
  v858.3125,124,ffff,12
  v858.3625,126,ffff,f3
 dv859.3125,14c,ffff,1333
 dv859.4125,150,ffff,1223
 dv860.3125,174,ffff,3ac3
 dv0x320   ,320,ffff,11a	this one is unknown or suppressed by user
;VER=3
;ID_hex,COLOR_dec,PRIO_dec,TITLE_str,LASTNOTED_hex,HITS_hex,USAGE_hex,ID_dec,ID_str,LASTNOTED_mm/dd/yyyy,LASTNOTED_hh:mm
00b0,1,99,"Franklin/Springb. '2'",3a0066ee,547927bb,1c,176,#00B0,11/01/2000,13:54
00d0,4,99,"Springboro Primary",3a006447,231552c5,1e,208,#00D0,11/01/2000,13:43
00f0,4,99,"fire springboro",3a004ed2,19337641,0,240,#00F0,11/01/2000,12:11
Detailed Specification of File Format for Groups, Radios, and Patches |
|||
| Field | Format | Contents | Example |
| ID_hex | Hex Number 0..ffff | Entity ID - Radio, Talkgroup, or Patch # | 00b0 |
| COLOR_dec | Decimal 0..63 | Color to be assigned to this entity's descriptive text while it is on a call | 9 |
| PRIO_dec | Decimal 0..99 | Priority to be given this entity for selecting it for monitoring. If zero, behavior depends on the setting of SEEKNEW, NEWRADIO, and/or NEWGROUP | 6 |
| TITLE_str | Quoted String | Label for that group/id/patch, usually typed in via g/i/p commands or auto-annotated for radios. | "WCC Primary" |
| LASTNOTED_hex | 32-bit Hex | Timestamp (UNIX time_t) for the last time this entry appeared as part of an actual call | 39fe26a5 |
| HITS_hex | 32-bit Hex | A counter proportional to the air time of the associated entity | 547923f3 |
| USAGE_hex | Hex Number 0..3f | 6 individual bits indicating participation of this entity in a
particular type of conversation: #01 Emergency Call |
3 - participated in an emergency call and/or a DES encrypted call (could have been both at once) |
| ID_dec | Decimal Number 0..65535 | Decimal equivalent of the first field | 368 |
| ID_str | non-quoted string | String representation of the ID. For type 1, could contain fleet/subfleet info | #0170 (hex type 2) 368 (decimal type 2) 3 02-12 (type 1 block/fleet/subfleet) |
| LASTNOTED_mm/dd/yyyy | Date String 10/14/2000...present | Date the entity last participated in a call | 10/14/2000 |
| LASTNOTED_hh:mm | Time String 00:00..23:59 | Time the entity last participated in a call | 07:34 |
Oct 14 01:42:20       [#0170]WCCC Primary #1D76 Af->#0170 WCCC Primary
Oct 14 01:46:45 Add2MSEL id #1067, group #0677(Fire Primary (!2))
Oct 14 01:47:18 MSEL id #1067 closed.
Oct 14 01:47:29       [#0170]WCCC Primary #16CF Af-> #0170 WCCC Primary
Oct 14 01:49:11 [#0A50]Franklin Firegroun #16E9 Af-> #0A50 Franklin Fireground
xxxxMSG.TXT (this file is optional and requires knowledge of the radio system setup and reporting procedures)
;columns are: s for status or m for message,number,text
s,1,place text here for status #1
s,2,place text here for status #2
...
s,8,place text here for status #8
m,1,responding
m,2,on the scene
m,3,returning available
m,4,returning unavailable
...
m,16,place text here for message #16
Color |
Decimal Value |
|---|---|
BLACK (not visible with default background color) |
0 |
BLUE |
1 |
GREEN |
2 |
CYAN |
3 |
RED |
4 |
MAGENTA |
5 |
BROWN |
6 |
WHITE |
7 |
DARKGRAY |
8 |
LIGHTBLUE |
9 |
LIGHTGREEN |
10 |
LIGHTCYAN |
11 |
LIGHTRED |
12 |
LIGHTMAGENTA |
13 |
YELLOW |
14 |
BRIGHTWHITE |
15 |
| for blinking, | add 16 |
| for beep, | add 32 |
| Radio | Hex Address | Decimal Address |
| Optoelectronics OS456/OS535/OPTOCOM |
80 | 128 |
| Icom R10 | 52 | 82 |
| Icom R8500 | 4A | 74 |
| Icom R7100 | 34 | 52 |
| Icom R7000 | 8 | 8 |